When it comes to Sunday suppers, roast chicken is one of the classics. And for a good reason, too. These birds are the perfect cheap dinner idea, and they’re versatile enough that you can repurpose the leftovers all week long.
Learning how to roast a chicken sounds intimidating, but you don’t need to fret. The Taste of Home Test Kitchen has the tips and tricks you need to make roast chicken taste just as good as Mom’s. The result is a juicy, tender, golden brown roast that’s perfect when paired with roasted vegetables and a great side salad. It’s a dinner worthy of a special occasion, but it also works as a weeknight dinner.
Roast Chicken Recipe: How to Roast a Chicken
We’ve got plenty of amazing roast chicken recipes in our archives, but let’s start with one of our Test Kitchen’s favorites: Sunday’s Best Chicken from Arizona reader Amy Jenkins.
Ingredients
- 2 to 3 medium lemons
- 2 fresh rosemary sprigs
- 1 roasting chicken (6 to 7 pounds)
- 1 tablespoon olive oil
- 2 tablespoons minced fresh rosemary
- 1 tablespoon coarsely ground pepper
- 1-1/2 teaspoons kosher salt
Equipment You’ll Need


- A sturdy roasting pan makes the roasting process that much easier. The rack elevates the chicken to promote airflow around the bird, and the handles make it easy to remove the heavy pan from the oven.
- This probe thermometer is the best way to monitor the chicken’s temperature without opening the oven. Simply probe the chicken before you get started and watch the temperature rise.
- Roasted chicken releases juices as you carve, even if it’s been properly rested. Catch all those tasty juices to make a pan sauce by using a carving board with deep grooves.
- Speaking of carving, you’ll want to be sure your knife is super sharp. Use a knife sharpener to ensure the blade will make clean cuts through the chicken.
Step 1: Prep your chicken
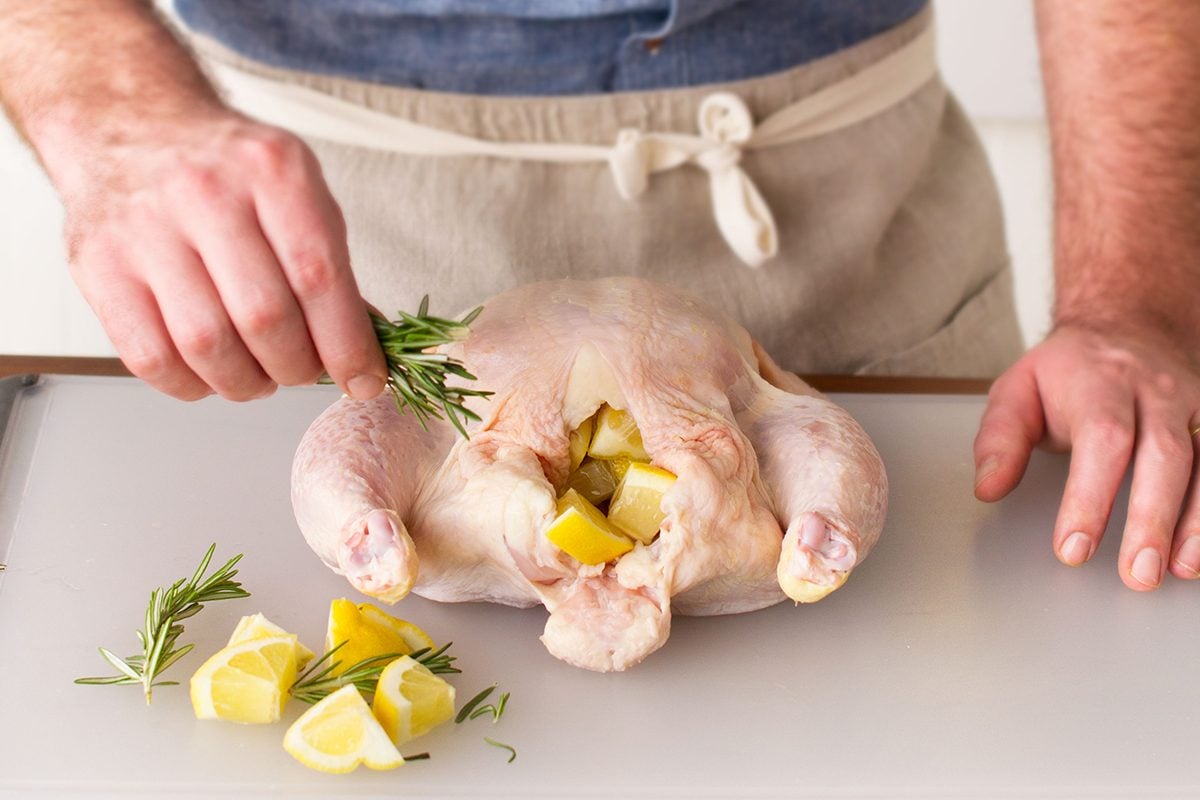
Before you do anything, take the bird from its packaging and pat it dry with paper towels. The drier the skin, the crispier and more delicious it will be.
Once the chicken is nice and dry, stuff it with aromatics—the herbs and citrus. Start by zesting two to three lemons. Set that zest aside for later. Then chop up the lemons into medium-sized chunks. Place these lemon wedges and the rosemary sprigs inside the cavity of the chicken (make sure you remove the bag of giblets!).
Step 2: Truss it up

Trussing is a fancy-sounding word for tying the bird up before it bakes. This keeps the chicken in a compact and uniform shape, allowing it to cook evenly. If this is a new technique for you, here’s how to make it happen:
- Grab a spool of butcher’s twine.
- Place the bird breast-side up.
- Place a long piece of string underneath the legs and tail, pulling it so it has an equal length on each side.
- Form a loose figure 8 around the legs, pulling the string up around the tops of the legs before crisscrossing it below the ankles.
- Pull the string tight to squeeze the legs together. Then loop the string back to the top of the ankles.
- Crisscross the string near the chicken’s cavity. Pull it up towards the wings, hooking it on either side of the breast.
- Flip the chicken over and tie the string around the wings.
- Trim off any excess twine.
Want extra guidance? Our step-by-step guide for trussing has pictures to help you get there!
Step 3: Pick the right pan

Most roast chicken recipes call for a shallow roasting pan fitted with a rack to elevate the bird. This ensures that hot air will circulate around the chicken, giving every inch a crispy, golden brown bake. For this recipe, you’ll need a small (14-inch) roasting pan with sides about three inches tall. We like using stainless-steel roasting pans because they’re lightweight and don’t react to acidic ingredients.
Once you’ve chosen the perfect roasting pan, place your trussed chicken on a rack in preparation for the next step.
Step 4: Season, season, season

Don’t be afraid of seasoning! This whole chicken requires a lot of flavor to permeate all the meat. Our Test Kitchen experts have a few tips for seasoning meat like a pro:
- Use kosher salt instead of table salt. It has a coarser grain, so you can cover more surface area of the chicken without creating an overly salty flavor.
- Don’t skimp on the salt. Use about one teaspoon of kosher salt per pound of meat.
- Season in advance. Salt pulls moisture away from the surface, drying out the skin and helping it crisp up to perfection. Let the chicken rest for at least 30 minutes, or as long as 12 hours if you have the time.
In this recipe, the chicken gets a good dose of seasoning from the lemons and rosemary inside the cavity. That doesn’t mean we can skip seasoning the outside, though. Start by brushing the outside of the chicken with oil. We use olive oil in this recipe, but you can substitute vegetable or grapeseed oil if you choose.
In a small dish, toss together the reserved lemon zest, minced rosemary, salt and pepper. Pat this mixture all over the chicken, making sure to get all the sides and nooks and crannies.
Step 5: Roast

Let’s get roasting! Bake the bird, uncovered, in a 350°F oven for at least two hours (it may take up to two hours and 45 minutes if you have a larger bird). As it cooks, baste the chicken occasionally with the drippings that collect at the bottom of the pan. (If you don’t have a baster, you can use a spoon to scoop the drippings and pour them over the top of the chicken.)
When done, the internal temperature should read 165ºF in the breast or 175ºF in the thigh. To get the most accurate reading, insert an instant-read meat thermometer into the thickest part of the meat (being careful not to touch the bone).
Test Kitchen Tip: If the chicken is browning too quickly, cover it loosely with aluminum foil.
Step 6: Let the chicken rest
Once the chicken has finished cooking, let it stand at room temperature for at least 15 minutes before carving. This cooling period allows the proteins to relax and let moisture in, giving you a juicy, tender bird. Tent with foil to keep the chicken warm.
Step 7: Carve the roast chicken
Last, snip off the string. Remove and discard the lemons and rosemary from the chicken cavity before carving. Don’t be afraid to carve—it’s easier than you think!
- Tilt the chicken over the roasting pan to empty any excess juices from the cavity (and use them to make gravy).
- Place the chicken breast-side up on a cutting board, positioning it so the wings are facing away from you at the top of the cutting board.
- Slice the skin between the leg and body to expose the joint.
- Pull the leg away from the body and slice through the hip joint, removing the thigh and drumstick in one piece.
- Flip the leg over to get a better view of where the two pieces meet. Separate the drumstick from the thigh by slicing along the drumstick curve until you reach the joint.
- Repeat these steps to remove the second thigh and drumstick.
- Loosen the breast meat by making a long, horizontal cut from the top of the wing to the point where the leg used to meet the breast.
- Remove the breast meat by making a deep, vertical cut along the breastbone. Then cut in an angled, downward motion underneath the breast towards the horizontal cut.
- Repeat these steps to remove the second breast.
- Finish by pulling the wing away from the body and cutting through the joint. Remove the wing tip, if desired.
Prefer to follow along with photos? Check out our complete how-to guide.
How to Store Roast Chicken
A cooked chicken will last three to four days in the refrigerator. It’s best to store chicken in an airtight container or sealed bag. Wrapping it in aluminum foil will work in a pinch, but exposure to air will dry out the chicken and ruin its flavor.
If you can’t eat all the leftovers within a few days, the freezer is your best bet. When the chicken is completely cooled, place it in an airtight container or freezer-safe bag, squeezing out as much air as possible. Freeze the chicken for up to four months. Thaw it in the refrigerator before reheating it.
Roasting Chicken with Vegetables
Roasting chicken on a bed of vegetables is an ideal way to create a flavorful vegetable side! The chicken juices will drip onto the veggies as they cook, seasoning them with unforgettable flavor.
Start by choosing the right vegetables. You’re looking for ones that can stand up to the chicken’s long cook time. Potatoes, root vegetables or winter squash work really well, but you can also use items like onions or celery if they’re cut into large pieces. (We’ve even used corn, like in this Roasted Chicken with Vegetables recipe.)
Then, toss the vegetables with a little oil, salt and the seasonings of your choice. Place them in a single layer on the bottom of a roasting pan or sheet pan. If the pan has a rack, you can place the chicken on the rack before putting it on top of the vegetables. You can also skip the rack, as the veggies will keep the chicken elevated from the pan’s bottom.
Cook the chicken according to the recipe above, being sure the chicken is cooked to a safe temperature before tasting the vegetables.
Roast Chicken FAQ
Do you cover a chicken when roasting?
We generally like to roast our chicken uncovered so the skin crisps up and turns an appealing golden brown. If the chicken starts to get too dark before it reaches the proper internal temperature, you can tent a piece of foil over the top to protect the skin from burning.
What’s the best pan to roast a chicken in?
If you have one, a roasting pan is the way to go. It’s basically an oversized casserole dish with a rack, which promotes airflow around the chicken to help it cook evenly. Don’t worry if you don’t have one; you can also roast chicken in a Dutch oven, a rimmed baking sheet, a casserole dish or a cast-iron skillet.
(Psst: Take the chicken outside and try one of these methods for cooking a chicken on the grill.)
How do you keep chicken from drying out?
Roasted chicken will taste dry when it loses too much moisture, but that’s an easy condition to prevent. It all starts with salt. Salting the chicken creates a dry brine when combined with the meat’s natural juices. It only needs 30 minutes (or as long as 12 hours) to create a protective layer. As a bonus, salt also seasons the bird, making it more flavorful.
You’ll also want to avoid overcooking the chicken. Meat loses moisture as it cooks, and no amount of brine can help you. Use a meat thermometer to measure when the chicken reaches the ideal temperature: 165ºF for the breast, or 175ºF in the thickest part of the thigh.
What can I use if I don’t have a roasting rack?
If you don’t have a roasting rack, it’s easy to improvise. Prop your chicken up on a base of crumpled aluminum foil, or layer the bottom of a sturdy pan with coarsely chopped veggies like potatoes, carrots and onions. This elevates the chicken—just like a rack. Plus you get a built-in side!

Roasted Honey Mustard Chicken
I love a good roasted chicken, and this one is easy and delicious. After a quick prep, the marinade does its magic in the fridge until time for roasting. It’s fun to dress the dish up by season based on whatever vegetables are fresh at the market. —Kara Brook, Owings Mills, Maryland
Contest-Winning Chicken Cacciatore
My husband and I own and operate a busy farm. There are days when there's just no time left for cooking! It's really nice to be able to come into the house at night and smell this wonderful slow cooker chicken cacciatore. —Aggie Arnold-Norman, Liberty, Pennsylvania
Grandma's Chicken 'n' Dumpling Soup
I've enjoyed making this rich homemade chicken dumpling soup recipe for over 40 years. Every time I serve this type of soup, I remember my southern grandma, who was very special to me and was known as an outstanding cook. —Paulette Balda, Prophetstown, Illinois
Roast Chicken with Creole Stuffing
I've used this recipe ever since I roasted my first chicken. Our whole family looks forward to it. The combination of shrimp, sausage, ham, vegetables and seasonings makes the stuffing unique and delicious.
Roasted Chicken with Veggies
Bright, tender vegetables surround this moist golden chicken seasoned with aromatic thyme. — Mary Beth Hansen, Columbia, Tennessee
Chicken Soft Tacos
My family loves these tacos. The chicken filling cooks in the slow-cooker, so it’s convenient to throw it together before I leave for work. At the end of the day, I just have to roll it up in a soft taco shell with the remaining ingredients and dinner’s ready in minutes. The chicken also makes a great topping for salad. —Cheryl Newendorp, Pella, Iowa
Tender Barbecued Chicken
After a long day at work, a slow-cooked meal is a great help. One of my family's favorites is this moist slow-simmered chicken. For an appealing look, choose a darker brown barbecue sauce. —Jacqueline Blanton, Gaffney, South Carolina
Roasted Chicken with Brown Gravy
Folks say this is the most delicious roasted chicken in brown sauce they've ever had. There's only one problem—there are never any leftovers! —Annie Tompkins, Deltona, Florida
Slow-Roasted Chicken with Vegetables
Even a beginner cook could make this slow cooked chicken and have it turn out perfectly. This recipe could not be easier. A few minutes of prep and you'll come home to a delicious dinner. —Anita Bell, Hermitage, Tennessee
Mango & Coconut Chicken Soup
I love preparing dinner in a slow cooker because it's "carefree cooking." This chicken dish uses ingredients that I love, such as coconut milk, edamame and fresh ginger. The Asian-style entree is perfect for a potluck party. —Roxanne Chan, Albany, California
Buttery Herb Roasted Chicken
Roasting chicken is always such a comforting thing, especially when you can pick the herbs right from your garden and pair them with some fresh citrus to smear across the bird! My family can't get enough of this herb-roasted chicken recipe. —Jenn Tidwell, Fair Oaks, California
Honey-Lime Roasted Chicken
It's hard to believe this finger-licking main course starts with only five ingredients. "The chicken is easy, light and so good," promises Springfield, Vermont's Lori Carbonell. "It's just as tasty prepared outside on the grill."
Slow-Cooked Mandarin Chicken
Oranges and olives are elegantly paired in this different but delicious dish. The chicken is marinated, then cooked slowly in a flavorful sauce, so it stays moist. —Aney Chatterson, Soda Springs, Idaho
Sweet and Spicy Chipotle Chicken
My husband and I have created many wonderful memories by sharing this meal with our friends. In the winter, we bake it indoors; in the summer, it works well on the grill, too! Either way the chicken pretty much cooks itself, leaving you plenty of time to visit with friends and family. —Ashlie Delshad, West Lafayett, Indiana
Chicken Barley Soup
No question—this is my favorite barley soup! It's so filling that I serve it as a hearty main dish, and I have given the recipe to many of our friends and relatives. It simply tastes too good to keep to yourself! —Diana Costello, Marion, Kansas
Slow-Cooked Greek Chicken Dinner
I got this recipe from my sister and my family really likes it a lot. It makes the house smell so good! The amount of garlic might seem high, but it's just right. You get every bit of the flavor without overpowering the other ingredients. —Terri Christensen, Montague, Michigan
Mom's Chicken Noodle Soup
My mother was a pastor's wife, and she did a lot of cooking for potlucks. This recipe's one she created herself. I serve it frequently to my husband and to our four children. Every one of them is a hearty eater! —Marlene Doolittle, Story City, Iowa
Can-Can Chicken
Here's a tasty take on the popular beer-can chicken. Once the bird is on the grill, the work's basically done. And cleanup is a cinch—a must for a guy like me. —Steve Bath, Lincoln, Nebraska
Citrus-Herb Roast Chicken
This dish is one of my all-time favorites...flavorful, juicy chicken with the aromas of spring: fresh herbs, lemon and spring onions. It’s the perfect one-pot meal. I make the gravy right in the pan. —Megan Fordyce, Fairchance, Pennsylvania
Nutty Oven-Fried Chicken
The pecans that give this dish its unique nutty flavor are plentiful in the South, and so is chicken. I love to make and serve this simple oven fried chicken dish because the chicken comes out moist, tasty and crispy. —Diane Hixon, Niceville, Florida
Garlic Clove Chicken
My Greek neighbors made this chicken frequently, and I couldn’t get enough of it. If you like garlic, you’ll love this recipe. —Denise Hollebeke, Penhold, Alberta
Tara's Spanish Chicken
This recipe has simple flavors that take me back to Grandma's house. She knew a million ways to cook a chicken, but this was my favorite. —Tara Imig, Fort Worth, Texas
Roast Spiced Chicken
Ever have a worn index card recipe from your mother with food stains covering the words? Spiced chicken has been in our family more than 50 years. —Cindy Kanwar, Blacklick, OH
Apple-Butter Barbecued Roasted Chicken
I love cooking so much I sometimes think of recipes in my sleep and wake up to write them down! This dream-inspired dish is my family's favorite way to eat chicken. —Holly Kilbel, Akron, Ohio
Roasted Lime Chicken
The subtle citrus flavor infused throughout this moist and baked lime chicken makes it a frequent request for family dinners. It's the ideal way to use fresh herbs such as rosemary, sage, thyme and parsley. —Kathy Lewis-Martinez, Spring Valley, California
Sunday Chicken Supper
I make this slow-cooked sensation with chicken, vegetables and seasonings. It's a hearty, homespun dish that satisfies the biggest appetites. —Ruthann Martin, Louisville, Ohio
Grandma's Cajun Chicken & Spaghetti
I’m originally from Louisiana, where my grandma spoke Cajun French as she taught me her spicy chicken spaghetti, lovingly made on an old woodstove. —Brenda Melancon, McComb, Mississippi
The Best Chicken & Dumplings
Homemade chicken and dumplings from scratch harken back to my childhood and chilly days when we devoured those cute little balls of dough swimming in hot, rich broth. It's one of those types of soup you'll want to eat again and again. —Erika Monroe-Williams, Scottsdale, Arizona
Slow-Cooked Moroccan Chicken
Herbs and spices really work their magic on plain chicken in this dish, and the dried fruit adds an exotic touch. —Kathy Morgan, Ridgefield, Washington
Lemon & Thyme Roasted Chicken
I love lemon and thyme together so I decided to roast a chicken with that combo. The seasoning is simple, and the meat comes out moist and tender. —Pam Nelson, Beaverton, Oregon
Garlic-Roasted Chicken and Vegetables
The first time my Greek father-in-law made this chicken, he proudly shared the recipe with me. It's my favorite way to roast chicken.
Chicken Tamales
I love making these homemade tamales. They take a little time to make but are so worth the effort. I usually make them for Christmas, but my family wants them more often, so I freeze a big batch. —Cindy Pruitt, Grove, Oklahoma
Mama's Puerto Rican Chicken
My mom has a vast repertoire of recipes, and this extra-crispy, spiced-up chicken is the best one of the bunch. We love it served with a side of traditional red beans and rice. —Edwin Robles, Milwaukee, Wisconsin
Roast Chicken with Vegetables
Love a moist and tender chicken but not the mess of actual roasting? Use an oven cooking bag to keep chicken and veggies easily under control. It's a great way to make roast chicken with potatoes and carrots easy any night of the week. —Taste of Home Test Kitchen
Mimosa Roasted Chicken
This aromatic seasoned chicken with a rich and buttery champagne gravy will delight all who taste it. —Taste of Home Test Kitchen
Tangerine Chicken Tagine
My family and friends love foods from around the world, especially Moroccan entrees, so I created this flavorful dish. Cooking it in the slow cooker keeps each morsel moist and rich in flavor. —Brenda Watts, Gaffney, South Carolina
Balsamic Roast Chicken
When the aroma from this dish fills your house, your family will think you spent all day cooking. But this elegant, Sunday-special roast chicken, flavored with rosemary, wine and balsamic vinegar, is surprisingly simple to make. —Tracy Tylkowski, Omaha, Nebraska
Mom's Roast Chicken
This is the best way to cook a whole chicken that roasts up super juicy with crisp, golden skin. It's simply seasoned, but packs in so much flavor. —James Schend, Taste of Home Food Editor
Lemon & Sage Roasted Chicken
Whether it’s soaking in marinade or baking in the oven, this easy-to-prepare chicken allows ample hands-free time. —Jan Valdez, Chicago, Illinois
Roasted Chicken with Rosemary
Herbs, garlic and butter give this hearty meal in one a classic flavor. It's a lot like pot roast, except it uses chicken instead of beef. —Isabel Zienkosky, Salt Lake City, UtahThe post How to Make Simple Roast Chicken appeared first on Taste of Home.
source https://www.tasteofhome.com/article/how-to-roast-chicken/
0 Response to "How to Make Simple Roast Chicken"
Post a Comment