Cooking a turkey is a bit tricky. Most of us only cook a whole turkey once a year, and it takes so much longer than the chickens we’re used to roasting. Not to mention the pressure of serving a perfectly cooked bird to your entire family! Traditional turkey recipes usually result in overcooked, dry breast meat while you wait for the legs and thighs to come to 170°F. Brining helps, and spatchcocking will crisp up all the skin evenly, but you’ll still run the risk of over- or undercooking some of the parts.
The solution: deconstructed turkey. This turkey tip was made popular by Julia Child and can be found in Julia and Jacques Cooking at Home. It’s a great way to ensure all parts of the turkey stay juicy and moist. Not only that, but it cuts the roasting time in about half!
What Is a Deconstructed Turkey?
A deconstructed turkey has been broken down into its individual pieces: breast, legs and wings. You can cook them all together in a roasting pan as we describe below or use different cooking methods for each part. Roast the legs while you slow cook the breast, or braise the thighs on the stovetop to free up the oven for side dishes. A deconstructed turkey can still be brined, too, but it takes up significantly less space in the refrigerator.
Why Deconstruct a Turkey Instead of Cooking It Whole?
There are two major benefits to cooking a deconstructed turkey. For starters, it takes about half the amount of time to cook. Air can circulate more easily around the individual turkey pieces, reducing the cook time significantly. This method also allows you to easily remove the pieces from the oven as they finish cooking, ensuring the whole bird is juicy and moist.
Don’t worry about the pieces getting cold as they sit, either. When the whole bird is finished, you can place the turkey parts in a 500°F oven to crisp up the skin and reheat any meat that may have chilled.
Tools You’ll Need


- The first thing you’ll want to pick up for a deconstructed turkey is a pair of poultry shears. They make it infinitely easier to remove the backbone, and you could use them instead of a knife to break down the turkey if that feels less intimidating.
- You’ll also want a sturdy roasting pan with a rack or a baking sheet lined with an oven-safe rack. Elevating the turkey pieces from the bottom of the pan promotes airflow, crisping up the skin on all sides.
- To ensure your turkey cooks perfectly, you’ll definitely want to have a good thermometer. You can use an instant-read meat thermometer to temp the turkey when you think it’s finished, but we prefer using a probe thermometer. The probes allow you to remotely monitor the temperature, knowing what’s going on inside without opening the oven door.
How to Deconstruct a Raw Turkey
If you have a great local butcher near you, they can probably take care of this step for you, selling you a ready-to-roast deconstructed turkey. But it’s not too hard to do it at home, so don’t be afraid to tackle it!
Step 1: Prepare the turkey
Start with a defrosted turkey. (It would be extremely difficult to do this process on a half-frozen turkey!) Remove the giblets and neck from the cavity, saving them for making stock and gravy.
Step 2: Remove the wings
Place the bird breast-side down on the cutting board. Pull the wing away from the body and make small cuts until you can cut see the joint that connects the wing to the back. Flex the wing to pop the joint out of the socket before slicing through the joint to disconnect the wing from the body. If you hit a hard bone, you’ve missed the joint, so reposition your knife and try again.
Use your fingers to identify the knuckle joint that connects the wingtip to the wing. Slice through the joint and add the tips to the bag for stock. Repeat the process for the second wing.
Editor’s tip: If you’re running short on time, feel free to skip this step. Simply remove the wingtips, twist the wings to tuck them behind the back and roast them on the breast. They’ll be a little overcooked, but they have enough fat that they’ll turn out just fine!
Step 3: Remove the legs
Flip the turkey onto its side and pull the leg away from the body. If the turkey is very stiff, wiggle the legs around to loosen things up. Using your sharpest knife, slice through the skin until you reach the point where the leg meets the body. Cut a semi-circle shape around the oyster (a small, oval-shaped piece of meat on the spine). Don’t stress this part too much; if most of the oyster meat remains connected to the spine, it will still add flavor to your stock.
When your knife meets the thigh bone, pull the turkey leg up until it’s parallel to the spine. Hold the leg at the knee (where the drumstick meets the thigh) and pull the leg down away from the wing to break the joint. You’ll hear a satisfying “crack” when it’s finished. If you’re having trouble, the leg is probably too far extended. Pull it up towards the body and try again. Cut through the sinew in the now-exposed leg joint and continue to cut downwards along the backbone to remove the leg.
Repeat the process for the second leg.
Step 4: Remove the breast
Place the turkey breast-side down on the cutting board. Using a pair of kitchen shears, remove the backbone by cutting it on either side. Add the backbone to the bag for stock.
Turn the turkey over and remove the excess skin from the neck. Feel around in the neck area for the wishbone, a thin bone that runs along the top of each breast. Make a small slit on either side of the wishbone to expose the bone. Grab ahold of it with your hands and pull it towards you to remove it from the turkey. It’s sometimes helpful to grab this slippery bone with a paper towel to help with grip.
Using your palms, press down on the breastbone to flatten it.
Step 5: Admire Your Handywork
From here, you can season and roast the turkey straight away, or you can brine the turkey pieces using one of our turkey brine recipes. Use the bones to make turkey stock, an essential component of a great giblet gravy.
How Long Do You Roast Each Part of the Turkey?
When you’re ready to roast, arrange the turkey pieces on a baking sheet or roasting pan. Use an oven-safe roasting rack to elevate the pieces, or lay the turkey on a bed of vegetables. (You can’t go wrong with onions, carrots and celery, but stuffing is a fine choice here, too.) If you’re using a probe thermometer, insert it into the thickest part of the breast or the thigh. Wiggle the probe to ensure it’s in the deepest part and isn’t touching the bone.
Slide the turkey into the oven with the legs positioned towards the back. Oven temperatures are usually warmer near the back, giving the thighs the heat they need to reach their higher target temperature. While the turkey roasts, resist the urge to open the door, which cools down the oven and increases the total cooking time.
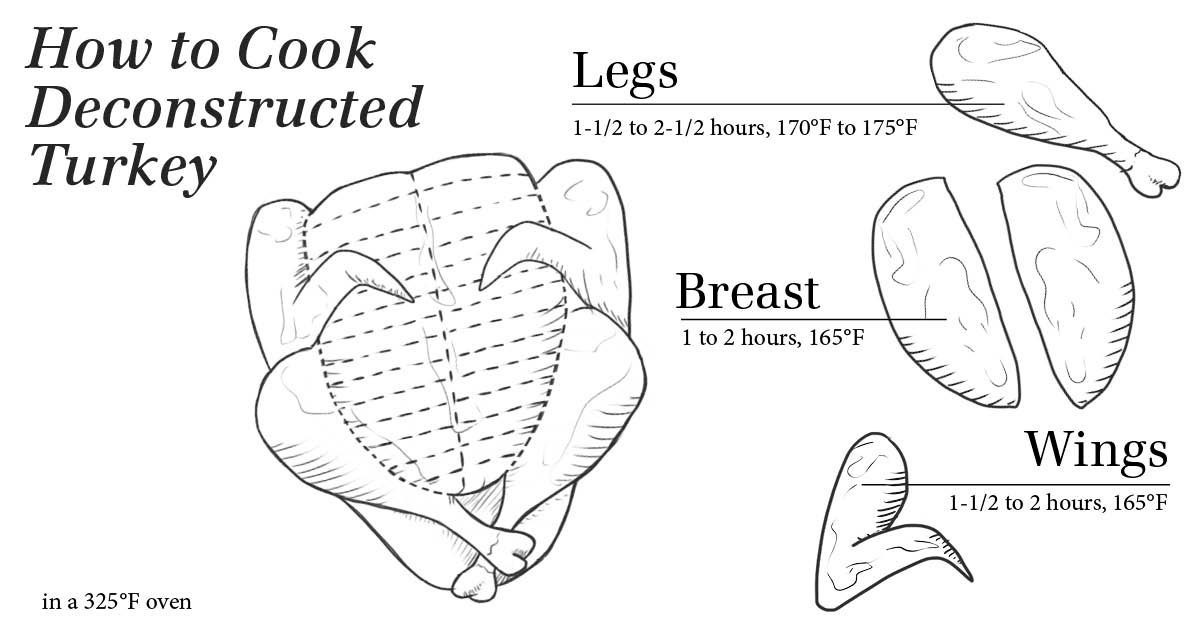
The roasting times provided in this chart are for defrosted, refrigerator-cold poultry roasted in a 325°F oven.
- Turkey breast: 1 to 2 hours, 165°F
- Turkey legs: 1-1/2 to 2-1/2 hours, 170°F to 175°F
- Turkey wings: 1-1/2 to 2 hours, 165°F
Editor’s Note: Your roasting time will vary based on the size of the turkey.
How to Serve Turkey
Thanksgiving isn’t just about the turkey: Having the right side dishes make all the difference. After you carve the turkey breast, plate it up with some of our favorite recipes. Don’t forget the gravy!

Fig-Carrot Stuffed Kabocha Squash
While searching for a new winter squash variety, I stumbled upon kabocha squash—it really wowed me. The flavor and texture are both rich and beautiful, and this recipe, which I improvised, really suits the squash well. —Caitlin Stephens-North, Malden, Massachusetts
Wild Rice with Dried Blueberries
I love the combination of rice and fruit, so this is a go-to Thanksgiving side dish at my house. I toss in mushrooms and toasted almonds to enhance the flavor. You can also include dried cherries or cranberries if you like. —Janie Colle, Hutchinson, Kansas
Best Curried Pumpkin Soup
I whipped this up for my family on Thanksgiving, and everyone was crazy about it! Even my brother, who is one of the pickiest eaters I know, asked for seconds of this curry pumpkin soup. —Kimberly Knepper, Euless, Texas
Jalapeno Green Beans
This simple green bean dish gets a bit of a kick from jalapeno pepper. If you don't like things too spicy, reduce the amount of jalapeno by half—or eliminate it completely. —Deirdre Cox, Kansas City, Missouri
Root Vegetable Pave
This is a stunning side dish to serve company. The robust blend features earthy root vegetables in a lightly herbed cream sauce. It's a perfect make-ahead dish for special occasions. —Carla Mendres, Winnipeg, Manitoba
Banana-Orange Sweet Potato Bake
Welcome fall with this simple side dish. It's a pleasant change of pace from the traditional casserole with marshmallows, and it's quite popular at potlucks. —Joan Hallford, North Richland Hills, Texas
Butternut Squash Panzanella Salad
This colorful salad is easy to make—and it's even easier if you use precut chunks of butternut squash. You can use pecans in place of the almonds or watercress instead of the arugula or spinach. —Nancy Buchanan, Costa Mesa, California
Roasted Red Pepper Green Beans
This recipe showcases a creamy sauce with shallot-and-chive cheese. The toasted pine nuts add crunch. Just a few ingredients—so easy! —Becky Ellis, Roanoke, Virginia
Greek Potato Casserole
The crunchy golden brown topping and tangy yogurt and feta make this recipe a winner. You can loosen the mixture with a few tablespoons of milk if necessary. —Cheryl Woodson, Liberty, Missouri
Parsnip, Pear and Pecan Salad
I didn't try parsnips until I was well into my 40s, but now I can't get enough of them. This salad is so delicious, I defy your kids to turn their noses up at it. —Jodi Taffel, Altadena, California
Butternut-Pineapple Crumble
I tried this sweet and crunchy casserole out on my 80-year-old parents and they loved it! Butternut squash now has a place at our holiday table year after year. —Barbara Busch, Henrico, Virginia
Quinoa with Roasted Vegetables
Grab all of your garden-fresh produce for this quinoa with roasted vegetables. The tangy dressing and fresh herbs really make the flavors shine in this wholesome quinoa side dish. —Sonali Ruder, New York, New York
Carrot Ginger Soup
This light, flavorful carrot ginger soup is vegan! It's made with pantry staples and comes together in a hurry, yet always seems to impress. Fresh ginger makes a big difference—and what isn't used can be wrapped tightly and tossed in the freezer to use later. —Jenna Olson, Manchester, Missouri
French-Fry Bake
When a friend brought this to a gathering at church, I simply had to ask for the recipe—what a fast and fun way to serve potatoes! It's always good to find a recipe that can sneak in a few extra veggies; the kids never find the carrots hidden inside this one. —Cheryl Newendorp, Pella, Iowa
Roasted Asparagus Risotto
This recipe's wow factor makes it perfect for special occasions. To save time, the asparagus and prosciutto can be roasting while the rice cooks on the stovetop. They'll be ready to stir into the risotto by the time the rice is done. —Deonna Mazur, Buffalo, New York
Rutabaga Carrot Casserole
This scoop-able side with its sweet, crunchy topping makes a delightful alternative to the traditional sweet potato casserole. —Joan Hallford, North Richland Hills, Texas
Fried Onions and Apples
Since a lot of delicious onions are grown in our state, they are always part of my menu. This tangy side dish is good with pork and beef. The inspiration for this unusual combination was a prolific apple tree!—Janice Mitchell, Aurora, Colorado
Zucchini in Dill Cream Sauce
As retired dairy farmers, we always knew fresh dairy products made a difference in my recipes. This creamy sauce combines some of our favorite foods. Josephine Vanden Heuvel, Hart, Michigan
Orange Buttermilk Gelatin Salad Mold
A dear friend shared this recipe with me years ago. Now it's my favorite dish to take to a church meeting, shower or any potluck event—it's always a hit. Whenever I serve this salad, people ask for the recipe. They find it hard to believe it's really made with buttermilk! —Juanita Hutto, Mechanicsville, Virginia
Leeks in Mustard Sauce
Leeks have a delicious oniony flavor and they are so wonderful in this side dish. The mustard sauce compliments the leeks flavor well and it goes well with many main dishes.—Taste of Home Test Kitchen, Greendale, Wisconsin
Molded Cranberry-Orange Salad
When I take this dish to potlucks during the holidays, people always ooh and aah. Feel free to top with whipped cream for added appeal. —Carol Mead, Los Alamos, New Mexico
Festive Corn 'n' Broccoli
This recipe is delicious and versatile. I often substitute a tablespoon of minced fresh basil for the dried, and two to three ears of sweet corn (about a cup cut fresh from the cob) for the Mexicorn. —Lucile Throgmorton, Clovis, New Mexico
Spiced Sweet Potato Fries
A spicy homemade seasoning blend shakes up everyone’s favorite finger food in this rendition of sweet potato fries. —Taste of Home Test Kitchen
Cheddar Bacon Grits
In the South, grits are served plain with a little butter or loaded with extras, like my recipe with bacon, cheddar and green chiles. —Amanda Reed, Nashville, Tennessee
Pressure-Cooker Cranberry Apple Red Cabbage
When I was looking for something new, I started playing with flavors and came up with this very tasty dish. My German grandmother would be impressed, I think! The colorful side dish is just right with pork. —Ann Sheehy, Lawrence, Massachusetts
Pumpkin-Coconut Soup
Thai food lovers will go crazy for this soup. It has a deep flavor from the combination of onion, coconut milk and spices. —Susan Hein, Burlington, Wisconsin
Fresh Ginger Carrot Salad
I created this salad as an alternative to the mayonnaise, raisin and carrot salad my mom used to make. I had some leftover ginger and really liked the fresh taste. I have a sweet tooth, and this salad satisfies it! —Lauri Cherian, Scott Depot, West Virginia
Candied Acorn Squash Slices
This acorn squash recipe was passed down to me from my grandma, who always served it at Thanksgiving. Now I make it whenever I'm feeling nostalgic. —Rita Addicks, Weimar, Texas
Slow-Cooked Wild Rice
This recipe has become such a family heirloom that I asked my mother's permission before passing it along. It has traveled to weddings, baptisms, landmark birthdays and wedding anniversaries—and it always makes people happy. —Janet Mahowald, Rice Lake, Wisconsin
Spaghetti Squash with Tomatoes and Olives
This squash is welcome as a side dish, but you can also top it with canned tuna to serve as a main dish. I use my own canned tomatoes for the best flavor. It's easy and so tasty! —Carol Chase, Sioux City, Iowa
Nutty Barley Bake
When I started bringing this distinctive dish to holiday dinners, a lot of people had never seen barley in anything but soup. They have since dubbed me "the barley lady", and now I wouldn't dare bring anything this dish. Even if I double the recipe, I come home with an empty pan. -Renate Crump, Los Angeles, California
Sweet 'n' Tangy Carrots
I dress up carrots with a brown sugar and mustard sauce as a side dish for my New Year’s meal. Garnished with a little bright green parsley, the carrots add color to the dinner plate. —Paula Zsiray, Logan, Utah
Herbed Baked Spinach
Parmesan cheese and garlic liven up this spinach dish, which goes well with met entrees and main-dish casseroles. Sometimes, I use broccoli as a spinach substitute. It's equally delicious.
Roquefort Pear Salad
Guests at a barbecue we hosted one summer brought this cool, refreshing salad. Now it's a mainstay at many of our gatherings year-round. The mingling of zesty tastes and textures instantly wakes up the taste buds. —Sherry Duval, Baltimore, Maryland
Slow-Cooker Polenta
This Italian classic is so simple to make, you can now make it any night of the week. —Elisabeth Matelski, Boston, Massachusetts
Spiced Acorn Squash
Working full time, I found I didn't always have time to cook the meals my family loved, so I re-created many of those dishes in the slow cooker. This treatment for squash is one of our favorites. —Carol Greco, Centereach, New York
Creamed Pearl Onions
When our children were small, we always celebrated Christmas at our house. This was one of many recipes I relied on that could be prepared a day in advance, which gave me more time to spend with guests. Everyone expected to see this vegetable dish on the table every year. —Barbara Caserman, Lake Havasu City, Arizona
Hearty Spinach Salad with Hot Bacon Dressing
This warm, hearty spinach and bacon salad offers comfort at any meal. The glossy dressing features a hint of celery seed for a special touch. —Taste of Home Test KitchenThe post How to Cook Deconstructed Turkey appeared first on Taste of Home.
source https://www.tasteofhome.com/article/deconstructed-turkey/
0 Response to "How to Cook Deconstructed Turkey"
Post a Comment